Android - RadioButton
A RadioButton has two states: either checked or unchecked.This allows the user to select one option from a set.If we check one radio button that belongs to a radio group, it automatically unchecks any previously checked radio button within the same group.
Create a New Android Project
Open Android Studio and create a new Project to test ImageView UI Widget.
You can view this blog to know how to create a Project in Android
Make Design for XML Layout
Your Activity Class (Java File) stored in Src->Your package Name->mainActivity.java
Open activity_main.xml from android resources and remove everything.Drag an Relative Layout and then drag a RadioGroup on Layout in Graphical mode of IDE.it Contains some RadioButton Widget, you can drag more radio button to layout within a RadioGroup if required.
Within a RadioGroup only a single Radio Button can be make selected.So it's a single choice widget within multioption.You can place multiple RadioGroup in an activity and in each RadioGroup a single selection is aplicable.
<RelativeLayout xmlns:android="https://schemas.android.com/apk/res/android"
    xmlns:app="https://schemas.android.com/apk/res-auto"
    xmlns:tools="https://schemas.android.com/tools"
    android:layout_width="match_parent"
    android:layout_height="match_parent"
    tools:context="dzone.jaipur.myapp1.MainActivity" >

  <RadioGroup
        android:id="@+id/radioGroup1"
        android:layout_width="wrap_content"
        android:layout_height="wrap_content"
        android:layout_alignParentTop="true"
        android:layout_centerHorizontal="true"
        android:layout_marginTop="152dp" >

        <RadioButton
            android:id="@+id/radio0"
            android:layout_width="wrap_content"
            android:layout_height="wrap_content"
            android:text="Choose 1" >

         <RadioButton
            android:id="@+id/radio1"
            android:layout_width="wrap_content"
            android:layout_height="wrap_content"
            android:text="Choose 2" >

         <RadioButton
            android:id="@+id/radio2"
            android:layout_width="wrap_content"
            android:layout_height="wrap_content"
            android:text="Choose 3" >
</RadioGroup>
</RelativeLayout>
Write code in java Class (Activity)
Your java File (Android Activity) should look like this..
public class MainActivity extends AppCompatActivity {

  private RadioGroup radioGroup;
  private RadioButton radioButton;
  private Button btnDisplay;

	@Override
	protected void onCreate(Bundle savedInstanceState) {
		super.onCreate(savedInstanceState);
		setContentView(R.layout.activity_main);

  addListenerOnButton();


	}
	 public void addListenerOnButton() {

    radioGroup = (RadioGroup) findViewById(R.id.radio);
    btnDisplay = (Button) findViewById(R.id.btnDisplay);

    btnDisplay.setOnClickListener(new OnClickListener() {

        @Override
        public void onClick(View v) {

                // get selected radio button from radioGroup
            int selectedId = radioGroup.getCheckedRadioButtonId();

            // find the radiobutton by returned id
            radioButton = (RadioButton) findViewById(selectedId);

            Toast.makeText(MyAndroidAppActivity.this,
                radioButton.getText(), Toast.LENGTH_SHORT).show();

        }

    });


}
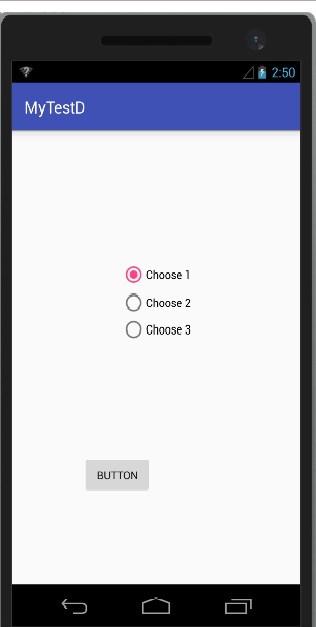
Program output on emulator screen
Now Run the Application by upper toolbar green triangle then select your device and get the desired output.
 Facebook
 Twitter
 LinkedIn
 Delicious